Back to TheWorxHub for Senior Living Main Menu
Adding a Work Order
TheWorxHub allows you to create both a work request or a work order. A work request is generally entered by a staff member and then approved and accepted as a work order by the responsible department. If the work you are entering does not need to be approved, you can enter it directly as a work order.
How to Add a Work Order
- Click on the Add button in the top right corner of the screen and select Work Order from the drop down.
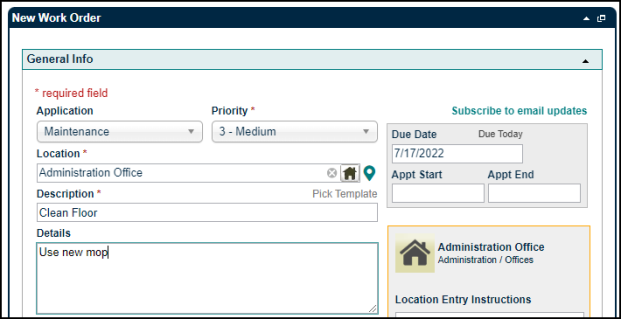
- Select the Department that this work order applies to from the drop down.
- Select a Priority for the work order.
- Click on the Location Picker (
 ) to select a Location for the work order.
- If you have access to the Space Management application, click the map pin icon (
 ) to select a location from a floor plan drawing. *Note: If you do not currently have this application, please contact your Sales Representative or Client Services for more information.
- If you have access to the Space Management application, click the map pin icon (
- Enter a Description of the work that needs to be performed.
- Type any additional details and notes in the Details box. *Note: This is an optional step. We highly recommend filling in as much details as possible, however if you choose to skip this step you can enter detailed step-by-step instructions in the Task List.
- Click on Add New Task to choose what type of tasks you'd like to add.
- In the pop-up window, select a Task Type from the drop-down menu, and then click the plus sign icon (
 ). *Note: You are able to add different task types to the task list.
 - The information you enter in the task field will depend on the Task Type you select:
- Checkbox: This option is common for simple task lists where each step is documented, and you want to track which tasks have been completed vs. not completed.
- Number form data input: This option is used when you need to capture a measurement, but there is no requirement to link that input to any sort of corrective action, such as capturing the volts of the generator.
- Text form data input: This option is used when you need to input free form text data, such as the start time of when you began the generator test, or capturing a qualitative value on the condition of the equipment.
- Barcode scan: This is a unique task type where you can specify that step 1 require you to scan the asset barcode for the equipment that you're working on. This helps to prove that a technician was actually at the required location. * Note: You can only complete a barcode task type from your mobile device where barcode scanning is supported.
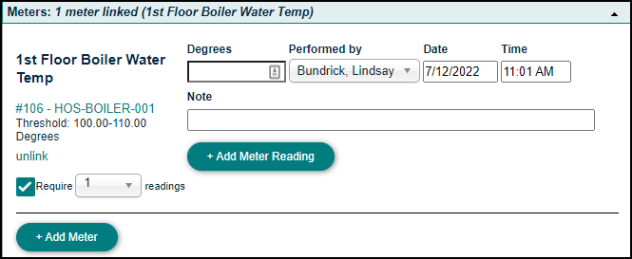
- Meter Reading: This option is used when you need to capture a reading on a pre-existing meter, such as water temperatures thresholds or odometer reading incremental meters. *Note: Meter reading style tasks can trigger action from a meter based scheduled work order.
- Pass/Fail: This task type will automatically trigger a corrective work order template from the failure. Because this question type requires you to leverage a pre-existing template, it's important to review any pass/fail tasks to ensure an appropriate template exists and it linked to the task.
- Add as many tasks as needed and click Save when you're finished.
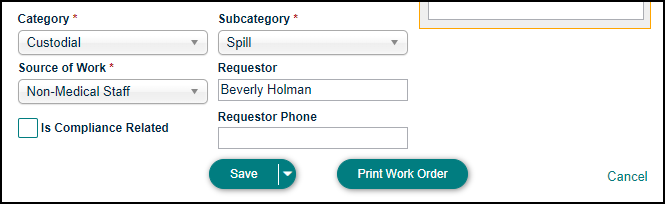
- Select a Category to specify the type of work being done. Then select a Subcategory to further describe the work. *Note: The Category you select will determine the Subcategories listed in the pick list.
- Choose a Source of Work from the pick list.
- Check the Is Compliance Related box if the work will be performed to fulfill a compliance requirement. *Note: The Is Compliance Related box is only visible for users with the Can See Compliance Checkbox permission in User Roles Settings.
- Enter the name of the Requestor and the Requestor Phone number.
- Click the Subscribe to email updates link to receive update notifications for this work order.
- Expand the work order panels by clicking on the panel title and enter any information needed.
- Click Save.
How to Add a Work Order from a Template
- Click on the Add button in the top right corner of the screen and select Work Order from the drop down.
- Select the appropriate Department from the drop down to filter the available templates.
- Click on the Pick Template link beside the Description field.
- In the Select a Template pop-up, click on the Template you want to use. You can use the search bar at the top to find the correct template.
- Once you have selected the correct template, click the Use Selected Template button.
- Click on the Location Picker () to select a Location for the request.
- If you have access to the Space Management application, click the map pin icon () to select a location from a floor plan drawing. *Note: If you do not currently have this application, please contact your Sales Representative or Client Services for more information.
- If you have access to the Space Management application, click the map pin icon (
- Enter the name of the Requestor and the Requestor Phone number.
- Click the Subscribe to email updates link to receive update notifications for this work order.
- Review the information populated by the template and make any necessary edits.
- Click Save.
Completing Additional Panels on a Work Order
Once you have saved the work order, there may be additional panels that should be filled out in order to process the work order.
- From your Dashboard, use the categories under the Work Order section or the search field to find the work order you need to add details to.
- Click on the work order number to open the work order.
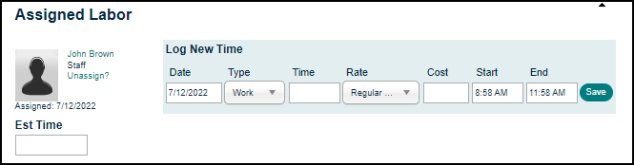
The Labor panel is used to track the Staff member, Contractor, or Team that is performing work, as well as any labor that they have performed on the work order.
- The Assign to Staff or Contractor option will be selected by default, but you can select the Assign to Team option if this work will be completed by a team. *Note: In order for a work order to be completed, it must be assigned to a Staff member, Contractor, or Team.
Assign to Staff or Contractor
- Check the box next to each Staff member or Contractor whose work needs to be tracked. *Note: If the work order is currently assigned to a team, you will need to remove the team assignment, and then check the box next to the users who need labor added.
- Click the Add Selected button at the bottom of the list. A record will populate for each selected Staff member or Contractor under Assigned Labor.
- In the user's record in the Assigned Labor section, enter the labor information in the Log New Time section. This will add labor time to the work order.
- Edit the Date, Type, and Rate as necessary.
- Enter the duration of the labor in the Time field, or enter a Start and End time and TheWorxHub will calculate the labor time for you.
- If you selected *FLAT in the Rate field, enter a Cost. If you selected a predetermined Rate, the cost will be calculated for you.
- Click Save to add that labor time to the work order.
Assign to Team
- Click on the Add button next to the team that should be assigned to this work order.
- Team work orders will appear in the Just My Work section on the Dashboard. Staff members on the team can then opt to assign themselves to the work order. You can also set up the Round Robin feature to automatically assign the work order to a team member.
The Inventory panel is used to track inventory items that are assigned to the work order. Assigning and consuming inventory items on a work order allows you to track work order costs and manage inventory levels.
The Asset panel allows you to link any associated assets to the work order. For example, if the work order involves fixing an air conditioning unit, you could link the appropriate asset to the work order in order to keep track of work that was done on the asset.
If the asset you are linking to the work order has been set to track downtime, the linked asset will be set to the "Out of Service" status and a downtime event will be created for the asset. The downtime event will end once the work order has been completed.
The Meters panel allows you to add Asset and Site based meter readings to the work order. An Asset meter is a meter that pertains to the usage of a particular piece of equipment, whereas a Site meter is a unique type of meter that applies to your whole site.
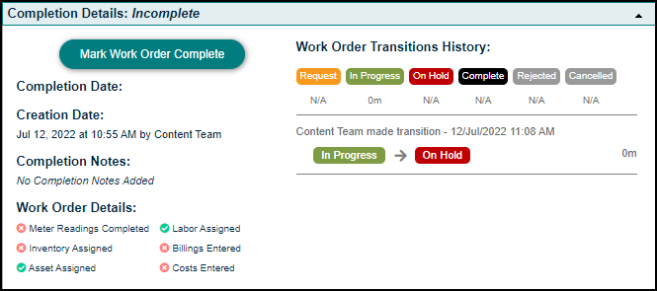
The Completion Details panel displays an array of data about the work order, including the status changes it has gone through, the Completion Date, Creation Date, and relevant information, such as whether labor has been assigned or costs have been entered.
- Click Mark Work Order Complete to complete the work order.
The Costs panel displays all cost records that have been added to the work order. This includes costs that are automatically aggregated from staff or contractor labor time, as well as any inventory consumption. You can also add ad-hoc contractor costs or purchase costs using the Add Cost button.
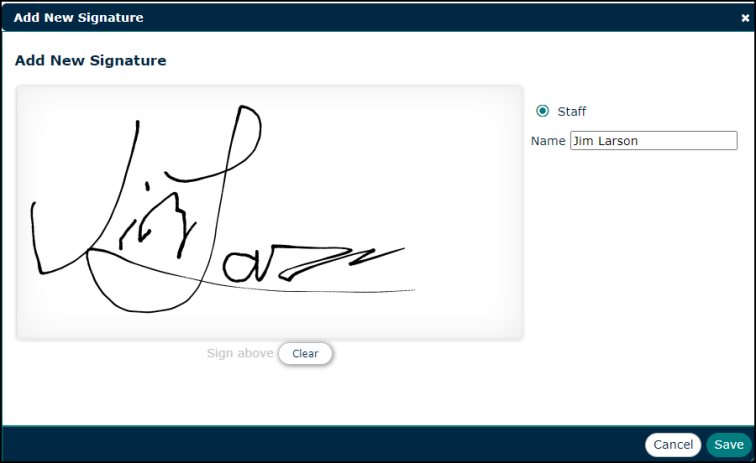
The Signatures panel allows you to add and track signatures on the work order.
- Click Add Signature.
- In the window that appears, select either Resident or Staff.
- Enter a Name for the signature.
- Sign in the signature area. You can reset the signature and try again by clicking Clear.
- Click Save to finalize the changes and add the signature.
The Billing Info panel allows you to create custom billing items for a work order.
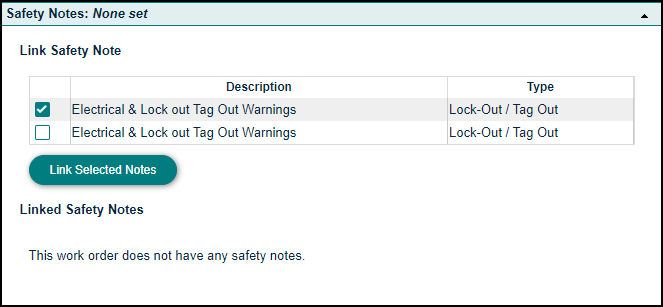
The Safety Notes panel allows you to associate safety protocols to a work order, ensuring your workers are taking proper safety precautions when performing work. *Note: Before you can add safety notes to a work order, they must be configured under the Safety section of TheWorxHub Settings.
- Check the box next to each safety note that should be linked to the work order under the Link Safety Note section.
- Click Link Selected Notes.
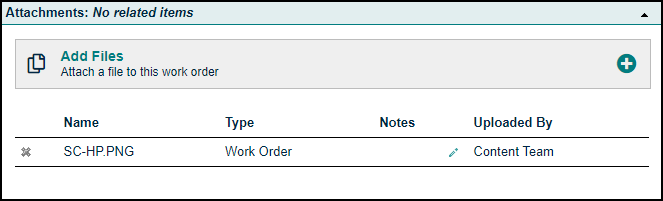
The Attachments panel allows you to quickly add an attachment to a work order. Files can be uploaded from your computer or chosen from the File Library.
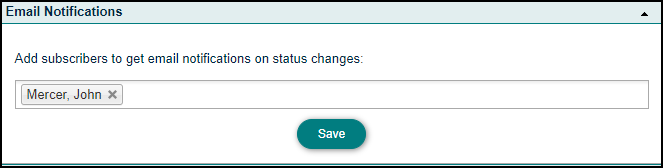
The Email Notifications panel allows you to add subscribers to receive email notifications on status changes for this work order.
- Select a user to add as a subscriber.
- Click Save.
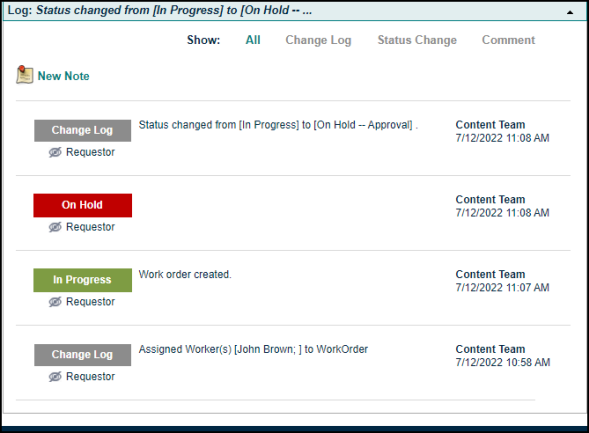
The Log panel displays a record of changes that have been made on the work order. You can view the changes that have been made, by which user, along with a time and date stamp.